
Creating a professional-looking white background for your product photos is key in ecommerce today. A clean white backdrop makes your products pop, showing off their true colors and details. Plus, many online stores need images with a white background, so this skill is a must for sellers and photographers.
In this guide, you’ll discover how to make a beautiful white background in Photoshop, even if your photos weren’t taken against one. We’ll cover various techniques, like using Photoshop’s selection tools and layer masks. By the end, you’ll know how to improve your product photos and boost your online presence.
Key Takeaways
- Understand the importance of white backgrounds for ecommerce and various applications
- Learn how to use Photoshop’s selection tools and layer masks to create a white background
- Discover techniques for adding realistic shadows and highlights to your product photos
- Explore advanced editing tips and tricks to enhance your white background photos
- Explore the benefits of outsourcing image editing for efficient and high-quality results
Selecting Your Product
Choosing the right product for a clean white background is the first step. Use Photoshop selection tools for this. Start by picking the Magic Wand Tool from the Toolbar and select “Select and Mask…” in the Option Bar.
In the “Select and Mask…” window, choose the “Select Subject” feature. Photoshop will make a selection around your product, separating it from the background. Use the tools on the left and top to fine-tune the selection. Once you’re happy, click “OK” to move on.
This step is key for a clean product separation. It uses Photoshop alpha channel and Photoshop layer masking. With a precise selection, you’re ready for the next steps to get a professional look.
Creating a Layer Mask
Layer masks are key in non-destructive photo editing in Photoshop. They let you show or hide parts of a layer without changing the original image. This is super useful for tasks like photoshop layer masking, photoshop transparent background, and photoshop background editing.
To start, duplicate your background layer. Keep your selection active, then click on the layer mask icon at the Layers panel’s bottom. This makes a mask of your selection on the “Product” layer. Layer masks use grayscale to set the layer’s transparency – black hides, white reveals, and gray levels adjust opacity.
After making your layer mask, use the Brush tool to fine-tune it. Black on the mask hides, while white reveals. This lets you make precise changes for smooth composites.
The layer mask you create is non-destructive. This means you can always change it without touching the original image. Layer masks are a must-have for any Photoshop user wanting to improve their digital art and make editing easier.
How to create white background in photoshop
Learning to make a white background in Photoshop is key for photographers, designers, and online sellers. It’s easy to turn your images into clean, professional shots with a few steps. This skill is great for product photos, headshots, or any other visuals.
First, pick your original Background layer. Next, make a new Solid Color Fill Layer and pick pure white. This adds a crisp white background behind your subject. You can adjust the white layer’s Opacity and Blend Mode to blend it with your image better.
Photoshop has tools to fix color issues or refine your subject’s edges. The “Select and Mask” feature lets you accurately set the edges and remove unwanted parts. Tweaking the Matting and Defringing settings can make your image look polished and professional.
With practice in creating white backgrounds in Photoshop, you can improve your images. They’ll look more appealing and meet the high standards of online sales or stock photography sites. Soon, you’ll be able to make high-quality visuals that highlight your products or subjects beautifully.
Adding Realistic Shadows
To make your product image look more natural, add a subtle drop shadow. This step is key for a three-dimensional look. Start by picking the product layer in your Photoshop file and add a drop shadow effect.
Adjust the shadow’s angle, distance, and spread for the look you want. Then, separate the drop shadow layer from the others so you can edit it alone. Use the Gaussian Blur filter to soften the shadow’s edges, making it look more real.
Next, use the Eraser tool to fix any shadow parts that don’t look right. The goal is to make the shadow blend well with the background. Lower the opacity of the drop shadow layer until it seems natural.
Real-life shadows have color and get blurry as they move away from the object. Apply these ideas to your Photoshop work for a professional look.
Adding a realistic shadow to your product image makes it more engaging and attractive. This trick is great for online product photos, where a clean white background is common. With precise photoshop clipping path and transparency tweaks, your product will pop and seem more real to potential buyers.
Enhancing with Highlights
After making a clean white background for your product image in Photoshop, it’s time for the final touches. Enhancing the highlights can make your product look more vibrant, three-dimensional, and professional.
To add highlights, start by creating a new Overlay layer in your Photoshop document. Click the “Create new layer” icon at the bottom of the Layers panel. Then, set the Blending Mode to “Overlay” in the Layers panel. This lets the highlights blend well with the image below.
Next, select the Dodge Tool from the Photoshop toolbar. Make the tool settings large and soft, set the Range to “Midtones”, and increase the Exposure to 20% or more. This lets you add highlights naturally, like how light would hit the product.
Take your time with the Dodge Tool, adding highlights to the parts of your product you want to highlight. Don’t overdo it, as too much highlight can look fake. The aim is to subtly enhance the product’s look and make it stand out against the clean white background.
Using Photoshop’s Overlay blending mode and the Dodge Tool makes adding highlights easy and effective. This takes your product images to a professional level in photoshop image editing, photoshop transparency, and photoshop product photography editing.
Background Removal Techniques
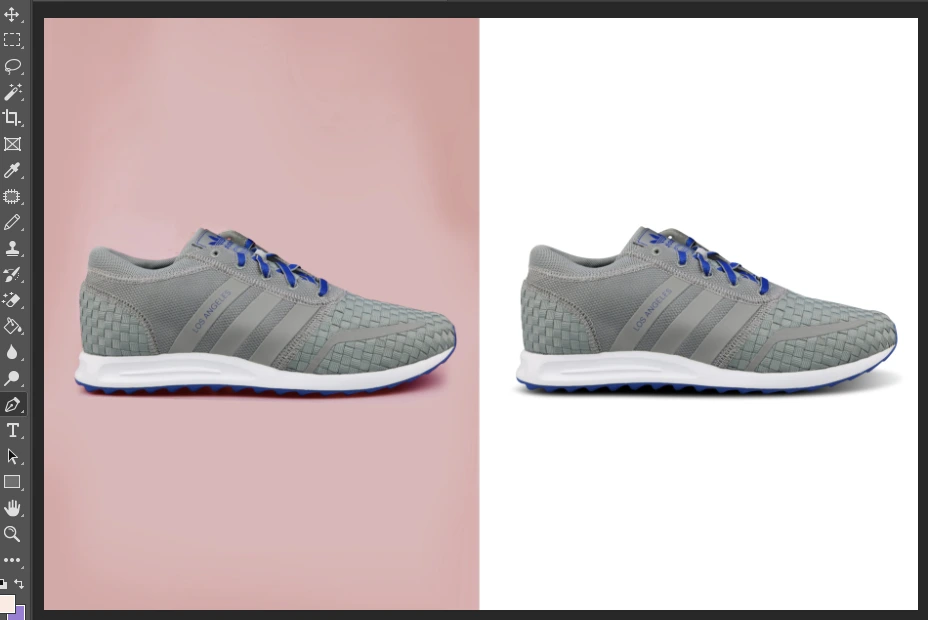
Removing backgrounds in Photoshop is key for product photography, e-commerce, and graphic design. This tutorial shows how to make any product photo have a white background. You don’t need to change the background color first. Just select the product, create a layer mask, and add a solid white layer behind it.
Begin by using the tool to select your product precisely. This ensures you only edit the right parts. After selecting, make a layer mask to keep the product separate from the background. This lets you adjust more without losing the original background.
Then, add a new solid white layer behind the product. This layer will be your new background. Use the tool to smooth out the edges, removing any white halos. Finally, tweak the levels, colors, and filters for the best look.
By following these steps, you can easily remove backgrounds and get professional-looking product images. With practice, you’ll become a pro at Photoshop background removal in no time.
Photoshop Selection Tools
Photoshop’s selection tools are key for removing backgrounds and editing images precisely. The Magic Wand Tool and Select and Mask feature help you pick out your product easily. You can fine-tune the selection in the Select and Mask window, adjusting the brush size and adding or subtracting pixels.
The Rectangular Marquee Tool and Elliptical Marquee Tool are perfect for making square or elliptical selections. The Lasso Tool lets you draw freehand for more detailed control. Photoshop’s Magnetic Lasso Tool uses photo edges to make selections, giving you clean, professional results.
Photoshop’s photoshop selection tools offer many ways to mask and isolate your subject. You can soften edges with feathering and anti-aliasing. The photoshop alpha channel lets you work with transparent backgrounds. Photoshop layer masking techniques also allow non-destructive editing.
Removing backgrounds, adding highlights, or refining product shots requires Photoshop’s powerful selection tools. Mastering these tools helps streamline your editing and creates stunning visuals that grab your audience’s attention.
Let's Try Background Editing for Free!
Importance of White Backgrounds
Creating white background product images is key for ecommerce and commercial photography. These backgrounds make your products look clean and consistent. Many online stores, like Amazon, need white background photos for listings.
White backgrounds are great for many designs, from logos to product shots. Photoshop’s tools make it easy to add a pure white backdrop. This removes distractions and fixes color issues. You can use layers and adjustment tools to get the job done.
To get a clean white background in Photoshop, pay close attention to details. Use the Threshold tool and histogram to check the white’s purity. Try different settings to perfect your technique and get high-quality images.
White background photos are popular on stock photo sites for their versatility. They lead to more sales. Online stores like Amazon have strict rules for product photos to be on a white background. Professional websites and blogs also prefer these photos for a polished look.
Advanced Editing Tips
Creating a white background is just the start. You can make your product photos look amazing by adding shadows and highlights. Adjusting the drop shadow and using the Dodge Tool can make your images look more real and appealing.
This technique makes the product look like it was shot against a real white backdrop. It adds depth and dimension to your photos.
Mastering Photoshop is crucial for professional-looking product photos. Tools like the Clipping Path help you isolate your subject. This makes removing the background easy and replacing it with something else simple.
The Transparency feature in Photoshop lets you create product shots with transparent backgrounds. This opens up many creative possibilities.
Improving your skills in Photoshop product photography editing is key. By using advanced techniques like shadow and highlight adjustments, you can turn ordinary photos into stunning works of art. This makes your products look their best and grabs your audience’s attention.
Saving Your Work
After you’ve worked hard on making a white background and enhancing your product image in Photoshop, saving your work is key. You might need to flatten layers, make the file size smaller, and export it in a format like JPEG or PNG.
Flattening your Photoshop layers is a must for a smaller file size. This is very important for web use, like selling products online. A smaller file size means faster loading times and a better experience for users. The export format depends on your project’s needs. For example, a transparent PNG is good for detailed product images, while a JPEG works well for simpler shots with a photoshop image editing background.
It’s vital to save and export your files correctly to keep the Photoshop transparency and quality of your photoshop product photography editing work. By doing this, you make sure your final images are perfect for use on the web or in print.
Outsourcing Image Editing
If you’re short on time or Photoshop skills, think about getting help from a pro service. Companies like Clippingpath offer expert Photoshop services. They handle everything from image editing to product photography editing and clipping path. This lets you focus on your photography while making sure your images stand out.
Clippingpath.co is a go-to for eCommerce product photo editing, helping over 500 companies worldwide. They’re pros at removing backgrounds, creating clipping paths, and more. Your product images will be perfect for online stores and social media, thanks to their quick 24-hour turnaround.
Outsourcing your editing can save you time and money, especially if you need lots of high-quality images. Clippingpath has clear pricing, starting at $0.40 per image for simple edits and $2.00 for retouching. This is great for eCommerce, where a clean white background is key for showcasing products.
Working with Clippingpath means you can focus on your business while your images get a pro touch. This can really help your products shine in the busy eCommerce world.
Let's Try Our Service for Free!
Conclusion
In this guide, you’ve learned how to make a professional-looking white background in Photoshop. You’ve discovered how to adjust levels and use layer masks. You also learned how to use the background eraser tool.
Now, you have the skills to improve your product photos. This makes them look better for business. It’s great for ecommerce, digital design, or photography.
Creating a seamless white background helps remove distractions. It keeps the lighting consistent. This makes your products or subjects stand out clearly and professionally.