Graphic design in Canva is getting more popular. The Canva clipping mask is a key feature that designers use. It lets users mix images and text smoothly, opening up many creative options.
Learning about clipping masks in Canva might seem hard. But, Canva’s easy-to-use interface makes it simple. In this article, we’ll show you how to make a clipping mask step by step. We’ll also talk about how it can improve your designs.
Mastering the Canva clipping mask can take your graphic design to the next level. It makes your projects look better and more interesting.
Understanding Clipping Masks in Graphic Design
Clipping masks are key in graphic design. They let designers play with visual content. This way, they can make complex and interesting designs.
What is a Clipping Mask?
A clipping mask lets you hide parts of an image using another shape. It’s like using a stencil to cut out parts of a picture. This creates a unique look.
This method is great for designers. It helps them make creative designs without changing the original image.
How Clipping Masks Differ from Other Masking Techniques
Clipping masks are different from other masking methods. They are simpler and more direct. Unlike layer masking, which can be complex, clipping masks use shapes to hide parts of an image.
This makes clipping masks a top choice for designers. They are easy to use for specific visual effects.
The Importance of Masking in Professional Design
In professional design, masking is essential. Techniques like clipping masks help designers make complex and engaging designs. They also help tell stories through visuals.
Using clipping masks can take a design from basic to amazing. It’s a key skill for graphic designers.
Why Use Clipping Masks in Your Canva Designs
Clipping masks bring creativity to your Canva designs, making them more professional and engaging. They help you achieve unique visual effects that grab your audience’s attention.
Creative Possibilities with Clipping Masks
Clipping masks let designers try new things. You can use shapes, text, or other elements as masks. This makes your visuals stand out, perfect for creative design tutorials and custom projects.
For example, a circular shape can mask an image, making it a focal point. Text can also mask an image, adding creativity to your work.
Professional Design Effects You Can Achieve
Clipping masks can make your designs look more professional. By choosing the right mask, you can get various professional design effects. These effects are great for social media graphics, marketing materials, or personal projects.
For instance, a well-chosen mask can highlight parts of an image or make typography look appealing. This makes your designs more engaging and polished.
Time-Saving Benefits for Designers
Clipping masks also save time and effort in your design process. They let you create complex effects without altering the original image. This is a big help when you’re working under tight deadlines or need to make quick changes.
Being able to easily create and modify clipping masks in Canva is a huge advantage. It makes your work more efficient and helps you meet deadlines.
Preparing Your Canva Workspace for Clipping Masks
Mastering clipping masks in Canva starts with a good workspace setup. A tidy workspace makes your design process smoother. It also helps you get the desired effects easily.
Required Elements for Creating a Clipping Mask
To make a clipping mask, you need specific elements. You’ll need a shape or text as the mask and an image to clip. Make sure these are ready in your Canva workspace.
Having everything ready makes the process easier. It lets you focus on the creative parts of your design. You won’t get stuck in technical setup details.
Setting Up Your Canvas Size and Format
Setting up your canvas size and format is key. Canva lets you pick from templates or customize your canvas size. Make sure your canvas matches the size you need for your project. This could be for social media, presentations, or print.
Organizing Your Layers for Efficient Masking
Layer organization is essential for complex designs with clipping masks. Canva’s layer system helps manage your design elements well. Organizing layers makes it easier to work with clipping masks.
To keep layers organized, group similar elements together. Label them clearly. This helps with clipping masks and improves your design workflow.
How to Do Clipping Mask in Canva: Basic Method
Canva’s clipping mask tool lets you unleash your creativity in graphic design. It makes your designs look professional with just a few steps. Here, we’ll show you how to create a clipping mask in Canva easily.
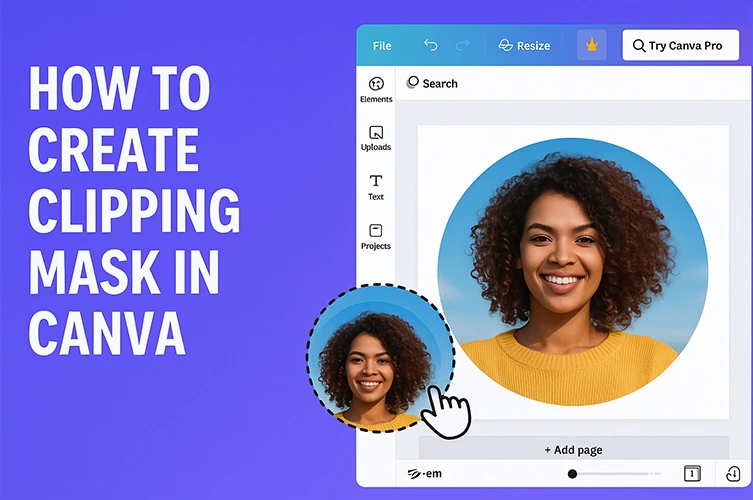
Selecting Your Base Shape
Start by picking your base shape. This shape will hold your image. Go to the “Elements” tab in Canva and pick a shape that fits your design. You can choose simple shapes like circles or rectangles, or go for something more detailed. Make sure your shape matches your image.
Adding Your Image
After choosing your shape, add your image. Go to the “Uploads” tab and pick your image file. Canva supports PNG, JPG, and GIF files. Upload your image and place it on top of your shape. Put your image on top for the mask to work right.
Creating the Mask Effect
Now, it’s time to make the clipping mask. Select both your shape and image by holding Shift and clicking on them. Then, right-click and choose “Create a group” or use Ctrl+G (or Command+G on a Mac). This groups your elements and applies the mask. Adjust your image inside the shape to get the look you want.
By following these steps, you can use Canva’s masking feature to make stunning designs. This basic technique is just the start. You can improve your designs by trying different shapes, images, and layering methods.
Creating Text Clipping Masks in Canva
Text clipping masks are a powerful tool in Canva for creating engaging visual content. By using text as a clipping mask container, designers can produce unique and captivating graphics that stand out.
Using Text as a Clipping Mask Container
To create a text clipping mask in Canva, start by selecting the text element you wish to use as your mask. This could be a heading, a phrase, or any text that fits your design concept. Ensure your text is in the correct font and size to achieve the desired effect.
Next, add the image or element you want to clip to your text. Position this image behind your text layer in the Canva editor. Then, select both the text and the image, and use Canva’s “Position” or “Effects” options to create the clipping mask.
Adjusting Text Properties for Better Mask Results
Adjusting the properties of your text can significantly enhance the clipping mask effect. Consider modifying the font style, size, and color to better suit your image or design.
Thicker fonts often work better for clipping masks as they provide a clearer container for your image. Experiment with different text properties to achieve the desired visual impact.
Examples of Text Mask Applications
Text clipping masks can be used in various creative projects, from social media graphics to marketing materials. For instance, using a bold headline as a mask for a scenic image can create an eye-catching banner.
Another application is in creating personalized gifts or custom designs where text masks can add a personal touch. The versatility of text clipping masks in Canva makes it a valuable technique for designers looking to innovate their work.
Advanced Clipping Mask Techniques in Canva
Let's Try Our Clipping Path Service!
Canva’s advanced clipping mask techniques open up a world of creative possibilities. By mastering these, you can make complex, eye-catching designs that grab attention.
Using Multiple Shapes for Complex Masks
Using multiple shapes to make complex masks is a key technique. It lets designers create unique effects by mixing different shapes and layers. Begin by making the shapes you want to use as masks. Canva’s shape tools can help you draw or change shapes as needed.
Layering multiple shapes makes it easier to create detailed designs. You can mix geometric shapes for complex patterns or use custom shapes for unique frames around images.
Layering Clipping Masks for Unique Effects
Layering clipping masks can lead to amazing results. Start with a clipping mask using one image or shape. Then, add another layer on top with a different shape or image.
This layering technique boosts your creativity and flexibility. It’s great for making complex graphics for marketing or social media.
Creating Transparent Areas Within Masks
Adding transparent areas to masks can make your designs more interesting. Use Canva’s transparency tools with clipping masks to achieve this. Adjusting transparency in your mask can create layering or highlight parts of your design.
This method is perfect for subtle, professional effects. For example, you can make a background image partially show through a text mask. This adds a creative touch to headers or titles.
Combining Masks with Other Canva Effects
Combining clipping masks with other Canva effects gives you more control. You can apply filters, adjust opacity, or add shadows and outlines. This can greatly enhance your designs’ visual impact.
Trying out different combinations can lead to unique and engaging visual effects. For example, adding a shadow to a clipped image can make it pop, or using a filter can change the image’s mood.
Troubleshooting Common Clipping Mask Issues in Canva
Clipping masks in Canva are great for creative projects. But, fixing common problems is key for the best results. Designers often face issues that can affect their work.
Fixing Alignment Problems
One big issue is when the mask and image don’t line up right. Make sure both are in the right spot in Canva. Use Canva’s tools to align your mask and image perfectly, for a smooth look.
Resolving Image Quality Issues
Image quality can be a problem with clipping masks. If your image looks fuzzy or wrong, check its resolution. High-resolution images will make your clipping mask look better.
Addressing Unexpected Results
At times, clipping masks don’t turn out as hoped. This might be because of how your layers are set up. Make sure your image is on top of the mask in the layer order. This is needed for a good clipping mask in Canva.
Workarounds for Canva’s Limitations
Canva is a great tool, but it has its limits. For complex designs, try breaking them down into simpler parts. Or use Canva’s advanced features like nested shapes to get the look you want.
By tackling these common issues, designers can use Canva’s clipping mask feature better. This improves their designs and makes their work easier.
Creative Projects Using Clipping Masks in Canva
Clipping masks in Canva open up a world of creative possibilities for designers. This feature lets you create stunning visual effects. It’s perfect for social media graphics, marketing materials, or personal projects.
Social Media Graphics with Clipping Masks
Social media graphics are key for online marketing. Canva’s clipping mask feature helps you make eye-catching graphics. Use it to add images to custom shapes, making your brand stand out.
Enhance your social media presence with visually appealing graphics. This includes profile pictures, cover photos, and promotional posts.
Marketing Materials Enhanced with Masks
Clipping masks also enhance marketing materials like brochures, flyers, and posters. They help create a cohesive and professional look. This aligns with your brand’s visual identity.
Use clipping masks to add a creative touch to your marketing materials. This makes them more engaging and effective.
Personal Projects and Custom Designs
For personal projects and custom designs, clipping masks offer endless possibilities. Whether it’s art, custom gifts, or personal branding, Canva’s feature can help you achieve your vision.
Experiment with different shapes and images to create unique and personalized designs. These designs reflect your style.
Comparing Canva’s Clipping Mask Features with Other Design Tools
Canva is a favorite among graphic designers. But how does its clipping mask feature stack up against Adobe Photoshop? Knowing the strengths and weaknesses of different tools is key for choosing the right software for your projects.
Canva vs. Adobe Photoshop Masking
Adobe Photoshop is known for its top-notch masking abilities. It offers a lot of control and precision. Canva, on the other hand, is simpler and easier to use. This makes it great for quick designs.
Photoshop is perfect for complex, professional work. Canva is better for simple, fast projects. The main difference is in control and complexity.
Canva vs. Other Online Design Platforms
Canva’s clipping mask feature sets it apart from other online design tools. Figma and Sketch have great tools but are harder to learn. Canva is easy to use and fast to get results.
Other platforms might have more advanced features. But Canva’s clipping mask is strong enough for most designs. It’s also great for working on different projects together.
When to Use Canva vs. Specialized Tools
Choosing between Canva and tools like Adobe Photoshop depends on your project. Canva is perfect for quick, simple projects. Its clipping mask feature and other tools make it great for beginners.
But for complex projects, specialized tools like Adobe Photoshop are better. Knowing what your project needs helps decide between Canva and more advanced tools.
Tips for Mastering Clipping Masks in Canva
Using clipping masks in Canva well needs creativity, technical skills, and practice. Getting good at clipping masks can really boost your design skills. It also opens up new creative ways to design.
Best Practices for Professional Results
To get professional results with clipping masks, follow some key practices. Start with high-quality images to make sure your designs are sharp and clear. Use simple shapes for your base when you can. They are easier to work with and give cleaner results.
Another important practice is to organize your layers well. Name your layers and group related elements. This saves time and reduces frustration, which is helpful for complex designs.
Time-Saving Shortcuts and Techniques
Canva has many shortcuts and techniques to make your work with clipping masks faster. Learn keyboard shortcuts like undo (Ctrl+Z) and redo (Ctrl+Y). They help you quickly change your masking process.
Using Canva’s grid feature also helps you align elements better. This makes the masking process more efficient and accurate.
Design Principles for Effective Masking
Knowing basic design principles is key for making good clipping masks. Think about balance and harmony in your composition. Make sure the masked elements fit well with the overall design.
Also, focus on contrast and color to make your masked designs pop. Using these elements right can really boost the visual impact of your graphics.
Keeping Up with Canva’s Feature Updates
Canva often updates its features, including clipping masks. Keep up with the latest by following Canva’s blog or joining design communities.
By keeping up with new features and best practices, you can keep improving your clipping mask skills. This keeps you competitive in your design work.
Conclusion
Learning how to use clipping masks in Canva opens up a lot of creative doors for designers. It lets them make professional-looking designs, improve their graphics, and work more efficiently.
A clipping mask summary shows how it can hide parts of images with shapes or text. This makes it easy to create detailed designs and have more control. It proves Canva is very flexible and can make graphics that look great.
As designers keep learning about clipping masks in Canva, they’ll make designs that really pop. By following the tips in this article, they can get better at designing. They’ll make visuals that grab people’s attention.